

We were already excited about GTA 6. The world, the driving, the inevitable plan to do one mission before spending an hour going somewhere completely different. You know how this goes.
But the settings menu gave us another reason to be excited.
There are options for reading the interface, hearing descriptions of cutscenes, reducing repeated button presses, making important objects stand out, and changing how demanding combat feels. Rockstar deserves credit for giving players this much room to adjust the experience. A setting that looks small on a menu can be the thing that lets someone keep playing.
We build accessibility tools at Coffee & Fun, so this is exactly the sort of detail we get distracted by. Happily.
This is a guide to the 57 distinct settings visible in the screenshots below, with explanations of where to find them and what they do. It covers the captured menus as of November 20, 2026. Values such as Off, Small, and Default describe what was selected in those captures; they are not recommendations for your setup. Use it as a starting point for finding the adjustments that suit you.
How to find GTA 6 accessibility settings
Open the Pause Menu, then select Settings. Rockstar's official settings guide confirms that accessibility options are spread across several tabs.
- Open Gameplay and scroll to Accessibility for tap and hold assistance. Continue down the tab for mini games, driving, and combat options.
- Open UI for text size, subtitles, navigation, and reticle settings.
- Open Display for visual effects, brightness reduction, and high contrast shaders.
- Open Audio for sound setup, individual volume controls, screen narration, and audio descriptions.
The screenshots use Xbox prompts: LB and RB move between tabs. On PS5, use L1 and R1. Select a setting to read its description on the right, then use the arrows, toggle, or slider to change it. The menu also includes Restore Default and Restore All controls if you want to reset changes.
Rockstar lists additional controller and camera options in its support guide. Here, we're sticking to the settings visible in this set of screenshots.
Every setting, explained
Each setting below has its own explanation: what it changes, how it can help, and anything useful to know before adjusting it. The numbering covers all 57 distinct options in our screenshots.
- Gameplay: settings 1–15
- Display: settings 16–23
- Text and subtitles: settings 24–30
- Navigation: settings 31–38
- Reticle: settings 39–44
- Audio and narration: settings 45–57
Gameplay settings
Where to find them: Settings → Gameplay. Scroll to Accessibility, then continue down the tab for the activity, driving, and combat options.
These settings change what the game asks you to do with your hands. You can adjust repeated presses, sustained holds, particular activities, and the demands of combat separately.
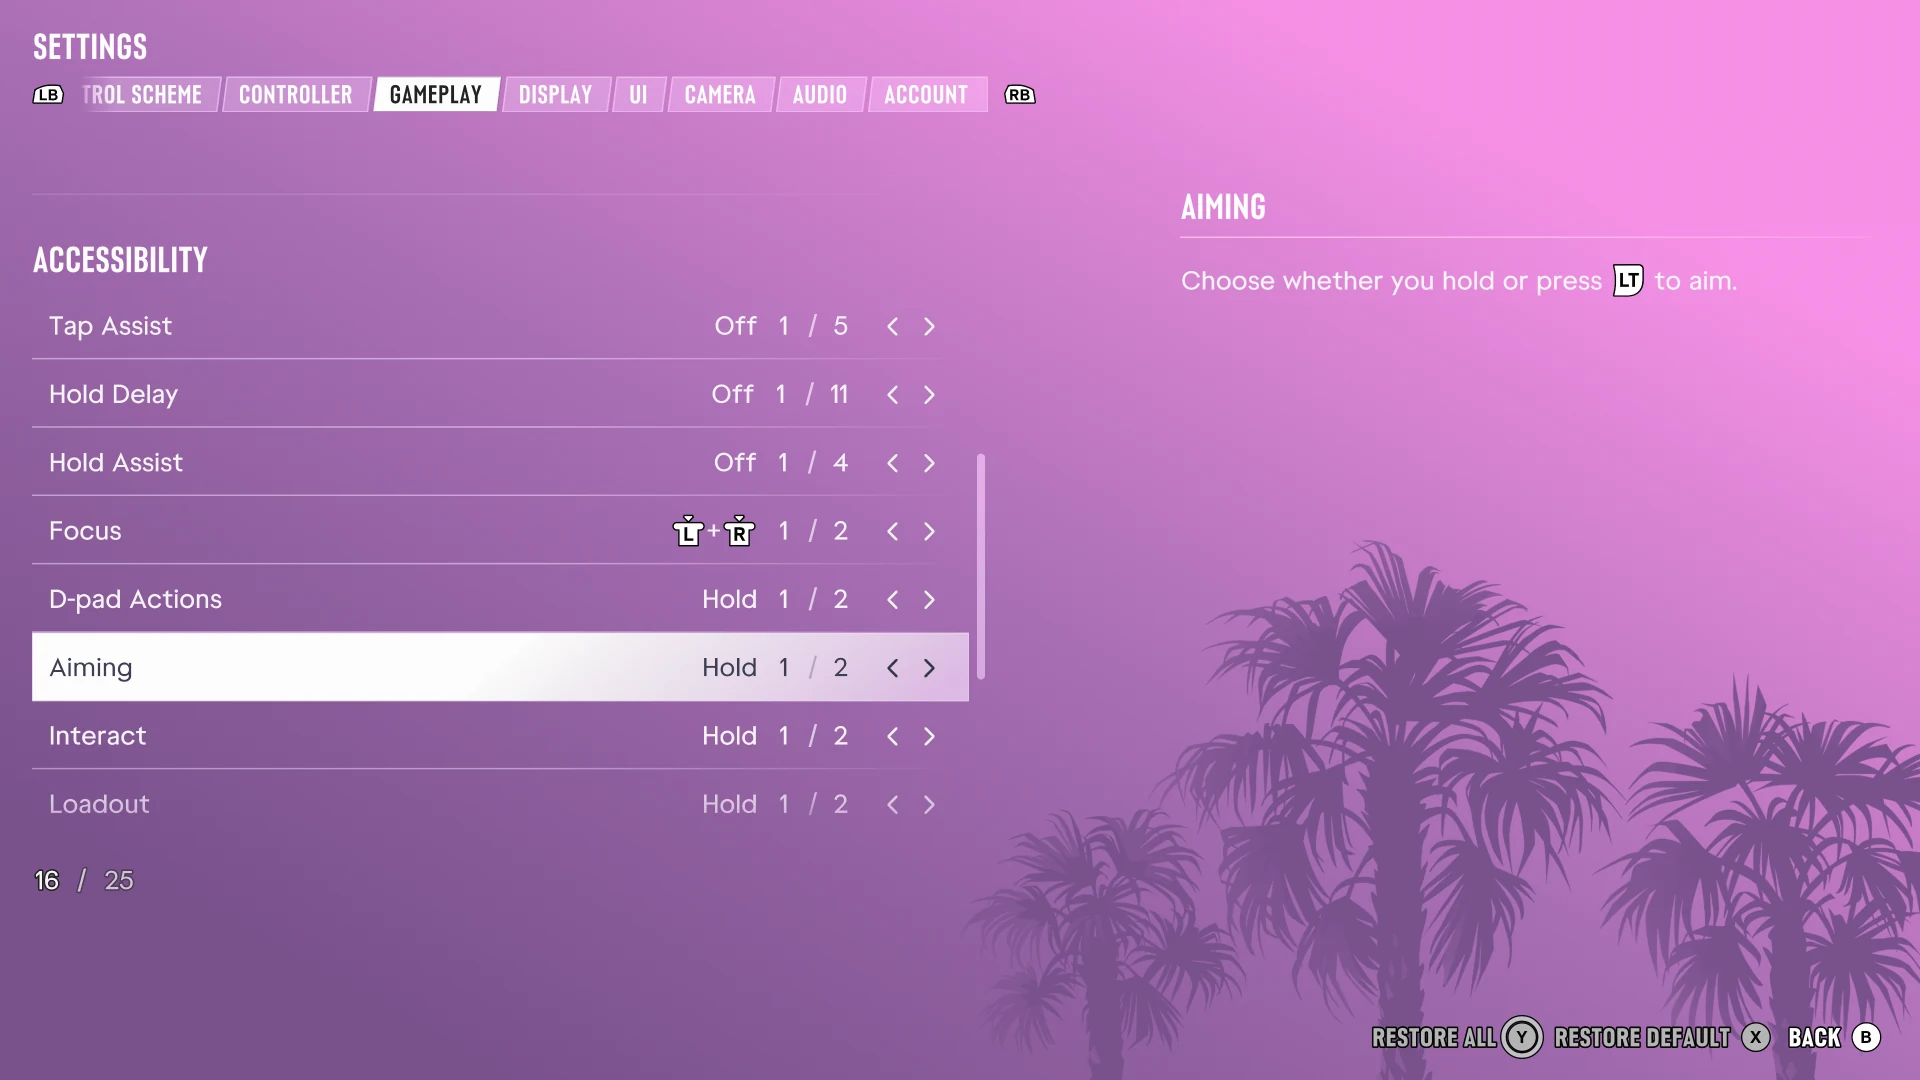
1. Tap Assist
Tap Assist reduces the number of physical button presses needed for actions that ask you to tap repeatedly. Its multiplier options let one press count for several, while the Hold option replaces repeated tapping with a sustained press. That gives players a choice depending on whether repetition or holding is more comfortable. The choices are Off, 2x, 3x, 4x, and Hold. Input option details.
2. Hold Delay
Hold Delay adds time before a hold input is recognised. This can help when you accidentally keep a button pressed long enough to trigger a hold action while intending a shorter press. The screenshot shows eleven choices, including Off. Increase the delay if accidental activation is the problem; a longer delay also means waiting longer when you deliberately hold.
3. Hold Assist
Hold Assist reduces how long you need to sustain a hold to complete an action. The 2x, 3x, and 4x choices shorten the required hold by different amounts; Off leaves it unassisted. This can help if maintaining pressure is tiring or difficult. Hold Delay changes when a hold is recognised, while Hold Assist changes the sustained effort needed to finish it. Hold assistance details.
4. Focus
Focus changes the input used to activate the game's Focus ability. The Xbox capture shows both stick buttons pressed together and a second available choice. Simultaneous stick clicks can be awkward when you are already using those sticks to move and look around. Check the alternative shown for your platform if that combination gets in your way.
5. D-pad Actions
This changes how directional-pad hold actions, such as quick navigation and radio controls, are operated. Hold keeps the action tied to a sustained press; Hold & Release gives you an alternative that does not require maintaining that pressure. On PS5, it is called Directional Button Actions. Try it if keeping a direction pressed makes another input difficult.
6. Aiming
Aiming lets you choose between holding the aim button and pressing it to toggle aiming. In the Xbox screenshot, that button is LT. The press option frees you from continuously squeezing the trigger while moving the sticks. Hold can still feel more immediate if you prefer aiming to stop when you release the trigger.
7. Interact
Interact lets you change between a held input and a press for interacting with people and objects. A press can reduce the need to maintain trigger pressure while deciding what to do next. If aiming feels comfortable but interactions do not, you can change this independently. The screenshot has Hold selected. Interaction settings.
8. Loadout
Loadout changes how you keep the loadout interface open while choosing equipment. With Hold & Release, you can release the opening control, choose your equipment, and press it again to close. This can make browsing easier when holding a shoulder button and operating a stick together is difficult.
9. Fishing
Fishing changes the reeling input. The menu offers Rotate, Hold, and Pull, giving you alternatives to making a circular stick movement. Different movements suit different hands: a rotation might be manageable for one player and tiring for another. Try the methods during fishing and keep whichever is easiest to repeat comfortably.
10. Nitrous
Nitrous changes whether using a vehicle's boost requires a hold or a press. This can reduce how many controls you need to keep pressed while steering. The capture shows Hold selected. A press option is useful when you want to concentrate on direction changes without maintaining a separate boost input. Nitrous controls.
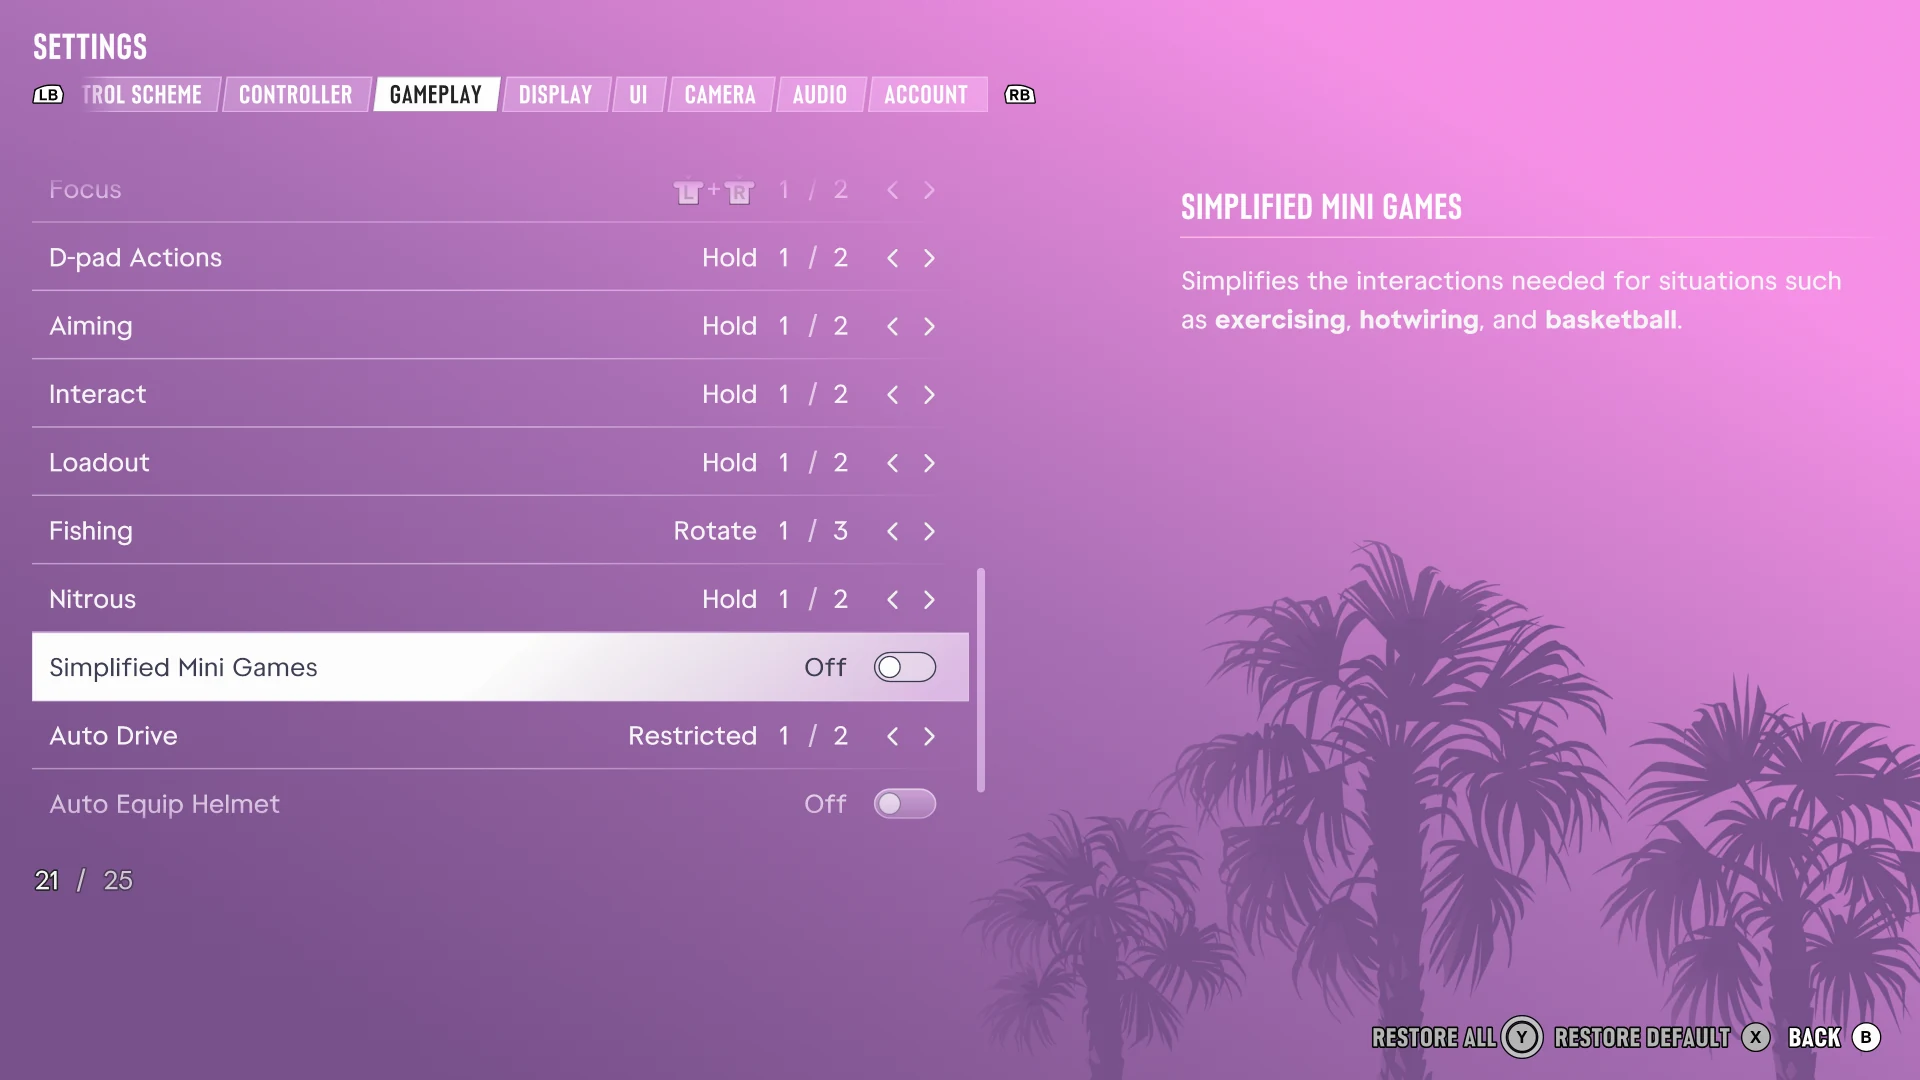
11. Simplified Mini Games
This simplifies the interactions required for activities such as exercising, hotwiring, and basketball. Those are the examples named in the menu. Turn it on if an activity's input sequence becomes a barrier to participating. A small side activity can still ask for a demanding movement, so having a separate adjustment here is useful.
12. Auto Drive
Auto Drive handles driving to a selected destination when using the cinematic camera. Restricted limits it to safe situations, while Unrestricted permits broader use. That can reduce sustained driving input or free up attention during a journey. The screenshot shows Restricted selected.
13. Auto Equip Helmet
This automatically puts a helmet on when you get onto a motorcycle or bicycle and removes it when you get off. It takes a small character-management task out of the routine of entering and leaving a vehicle. Enable it if you want that action handled automatically. Helmet setting details.
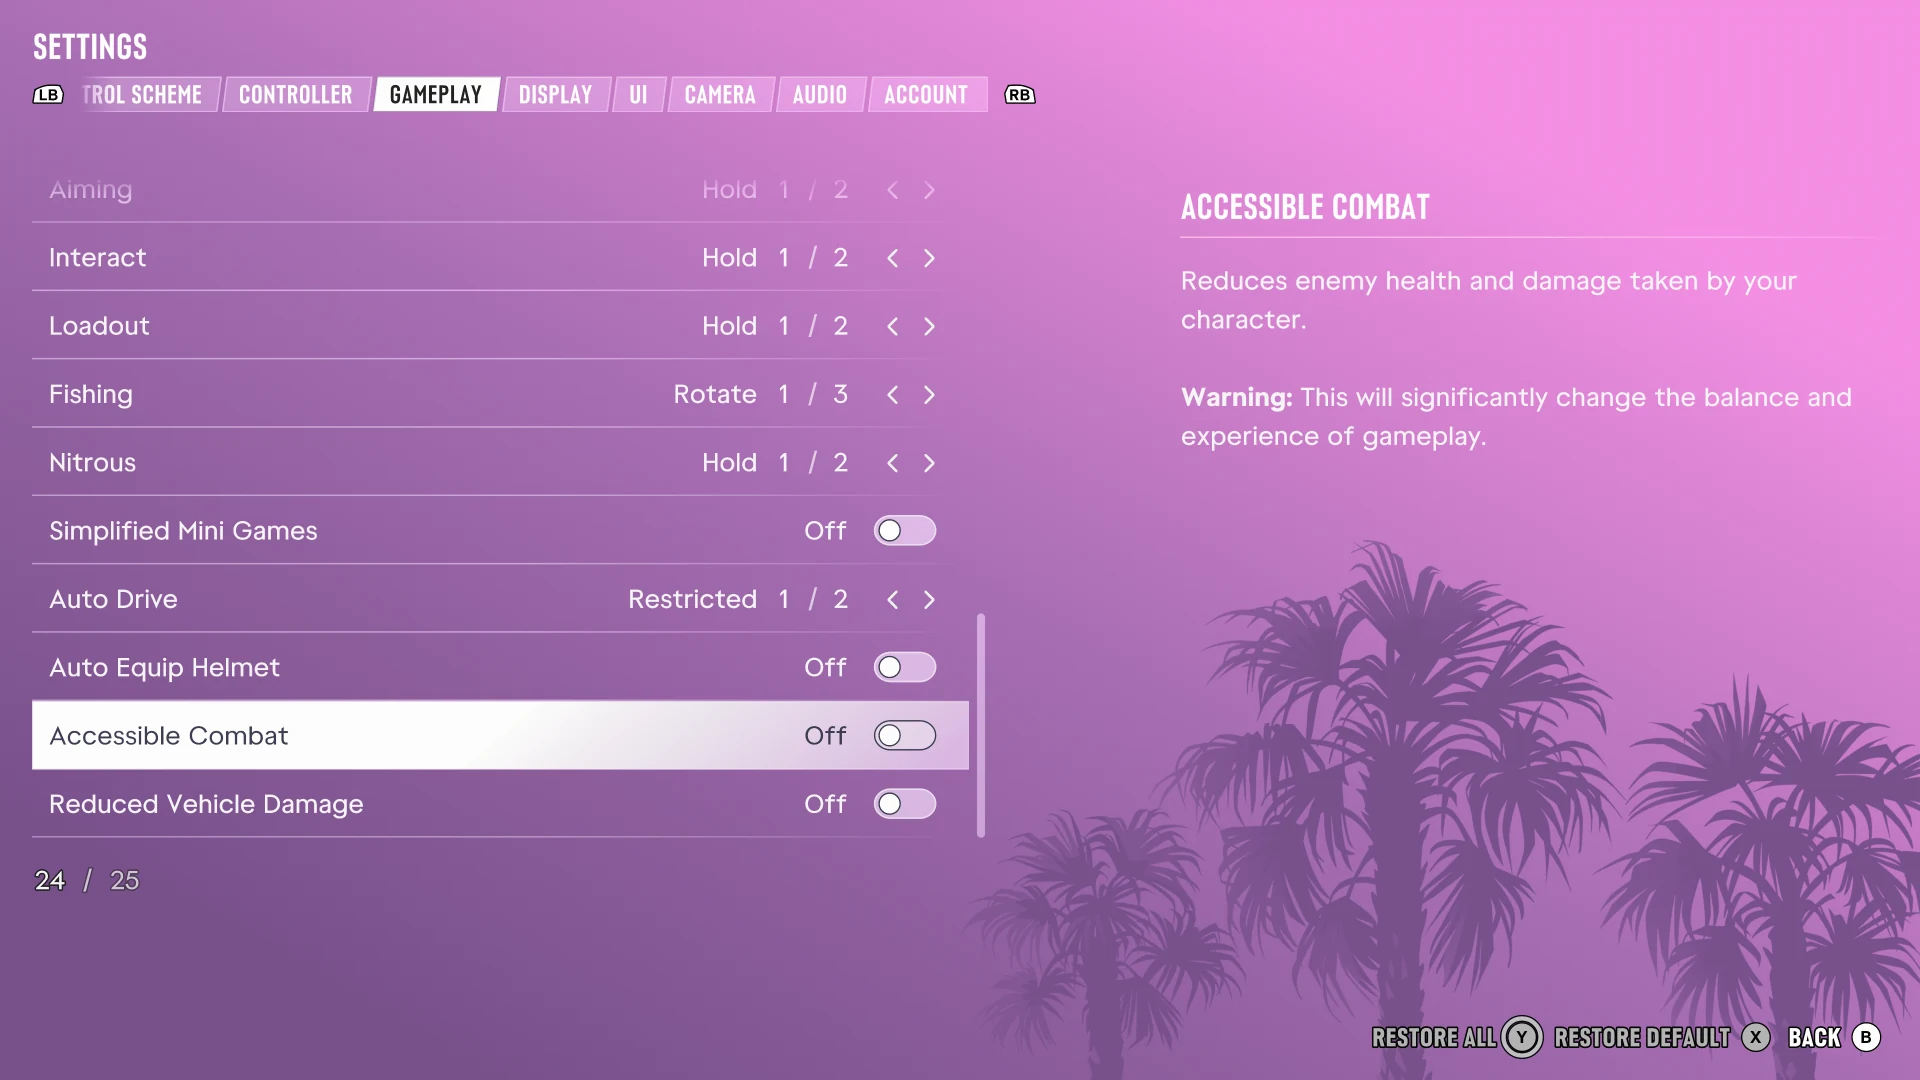
14. Accessible Combat
Accessible Combat reduces enemy health and the damage your character takes. Enemies require less damage to defeat, and mistakes are less punishing for your character. That may help when reactions, aiming, or repeated attempts become exhausting. The menu explains that this substantially changes gameplay balance, so choose it according to the experience you want.
15. Reduced Vehicle Damage
This reduces the damage your vehicle takes. It gives you more room for mistakes while driving and can help when keeping a vehicle intact becomes the obstacle to progressing. It has its own toggle, so you can adjust vehicle durability without making the same change to combat on foot.
Disabled players have different preferences about challenge, just like everyone else. The useful part is being able to choose these adjustments individually.
Display settings
Where to find them: Settings → Display. These options affect visual effects, lighting, graphic injury effects, and the visibility of people and objects.
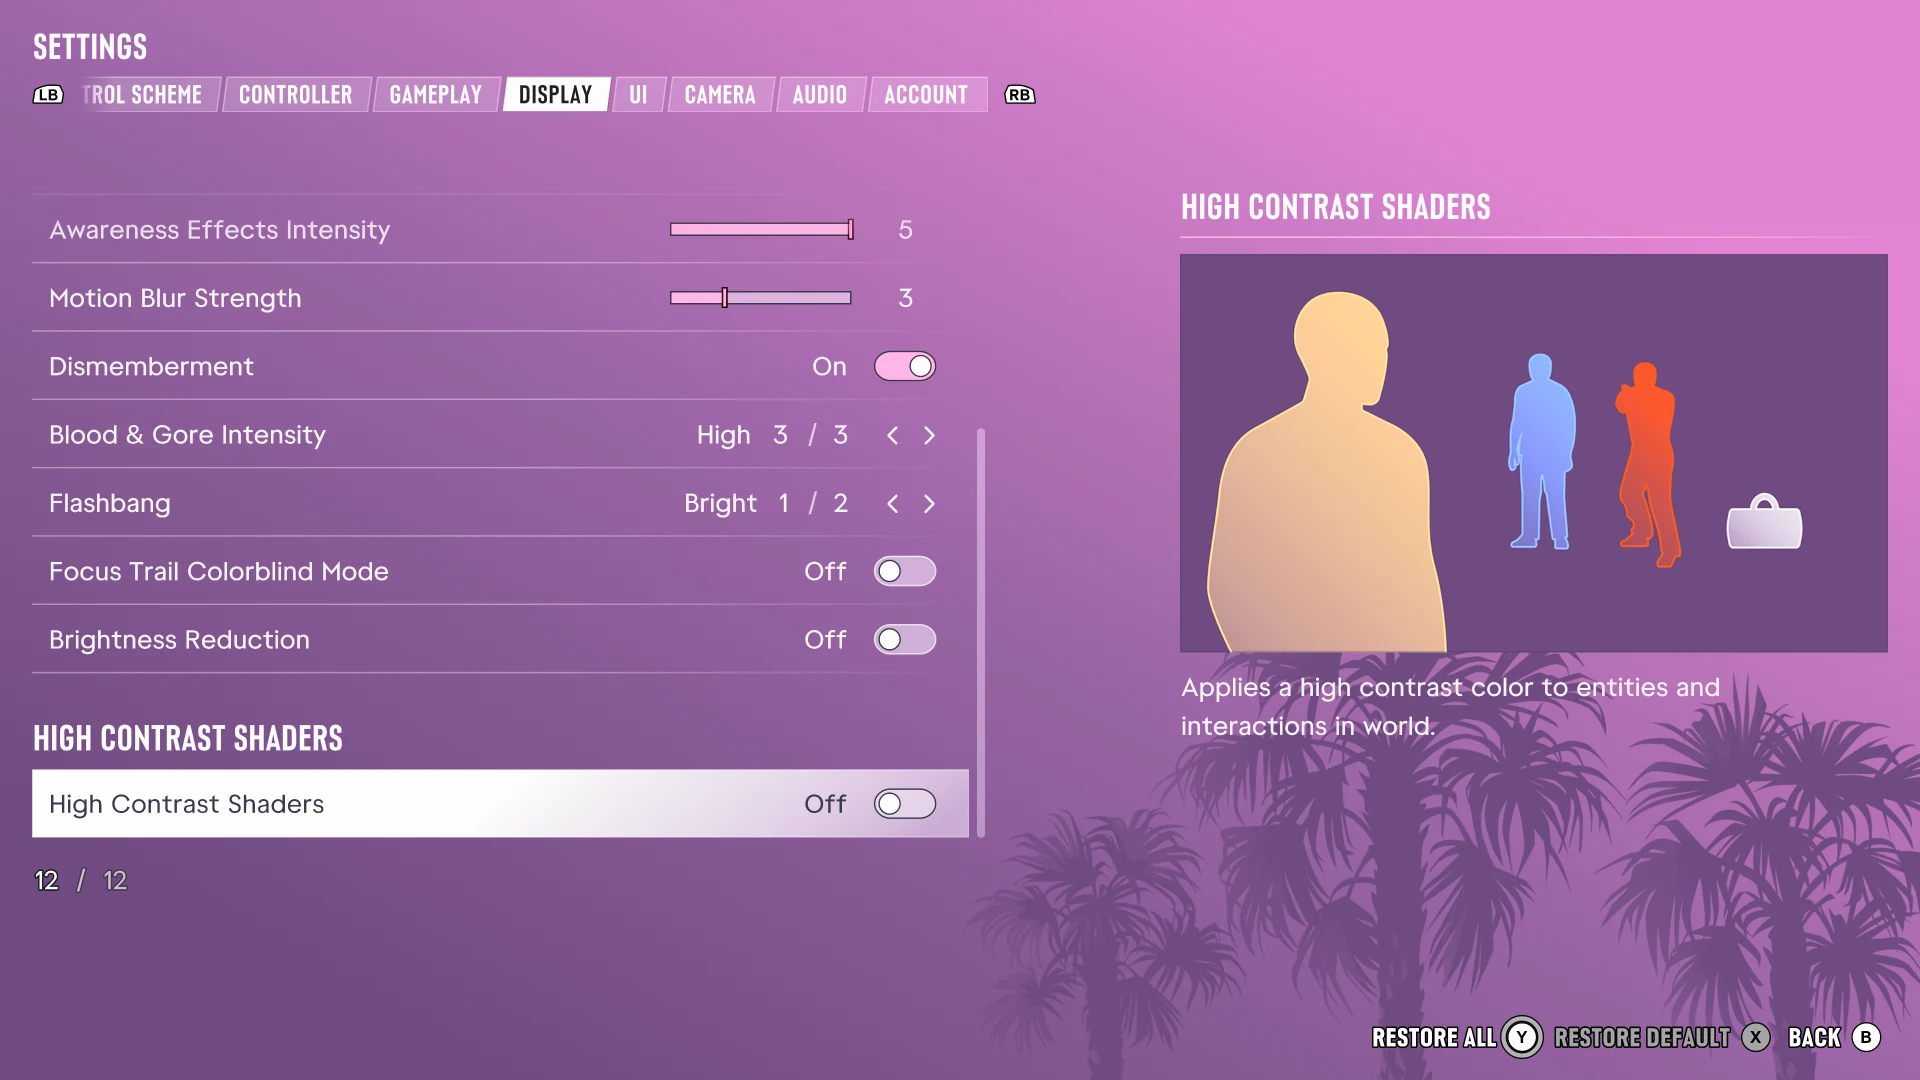
16. Awareness Effects Intensity
This adjusts the strength of effects around the screen edges that warn you about police and threats outside your view. Lowering it can make the picture less busy; increasing it can make those warnings easier to notice. Because the effect communicates useful information, compare its visibility as well as its intensity. Awareness effect description.
17. Motion Blur Strength
Motion blur adds a blurred appearance when the camera or character moves. Lowering its strength can make movement look clearer if the blur feels distracting or uncomfortable. Other players may prefer some blur, so compare it while turning the camera or driving. The screenshot shows 3; it does not show the slider's full range.
18. Dismemberment
Dismemberment controls whether the game shows body-part separation associated with certain injuries. Turning it off removes that particular graphic effect. This is a content preference as well as a potential comfort adjustment, and it is separate from how much blood and gore appears.
19. Blood & Gore Intensity
This changes the amount of blood and gore associated with injuries. The three levels are Low, Medium, and High, with High selected in the capture. A lower level can make violent scenes less visually graphic. Adjust it alongside Dismemberment if you want to reduce both kinds of effects. Display option details.
20. Flashbang
Flashbang changes whether the flashbang effect uses a bright or dark flash. Dark provides an alternative if a sudden bright screen feels uncomfortable. It changes the presentation of that effect, rather than being a general screen-brightness control. The screenshot has Bright selected. Flashbang options.
21. Focus Trail Colorblind Mode
This strengthens the colours used for Focus trails so the trails can be easier to distinguish. Enable it and compare how clearly you can follow them against their surroundings. It targets this specific visual cue; the interface has a separate Color Adjustments setting for its own colours. Focus trail description.
22. Brightness Reduction
Brightness Reduction applies a filter that softens bright lights in the game world while leaving the HUD unchanged. That distinction is helpful if you want a less intense scene without also dimming the information you need to read. It is a toggle separate from the Flashbang setting. Brightness Reduction details.
23. High Contrast Shaders
High Contrast Shaders applies contrasting colours to entities and interactions in the world. The menu preview shows people and an item picked out in different colours. This can make important things easier to find against a detailed background. Try it in the kinds of scenes where you struggle to separate a character or object from its surroundings.
Text and subtitle settings
Where to find them: Settings → UI → Scaling & Readability, then Subtitles & Captions. These settings change how you read the interface and recognise its symbols.
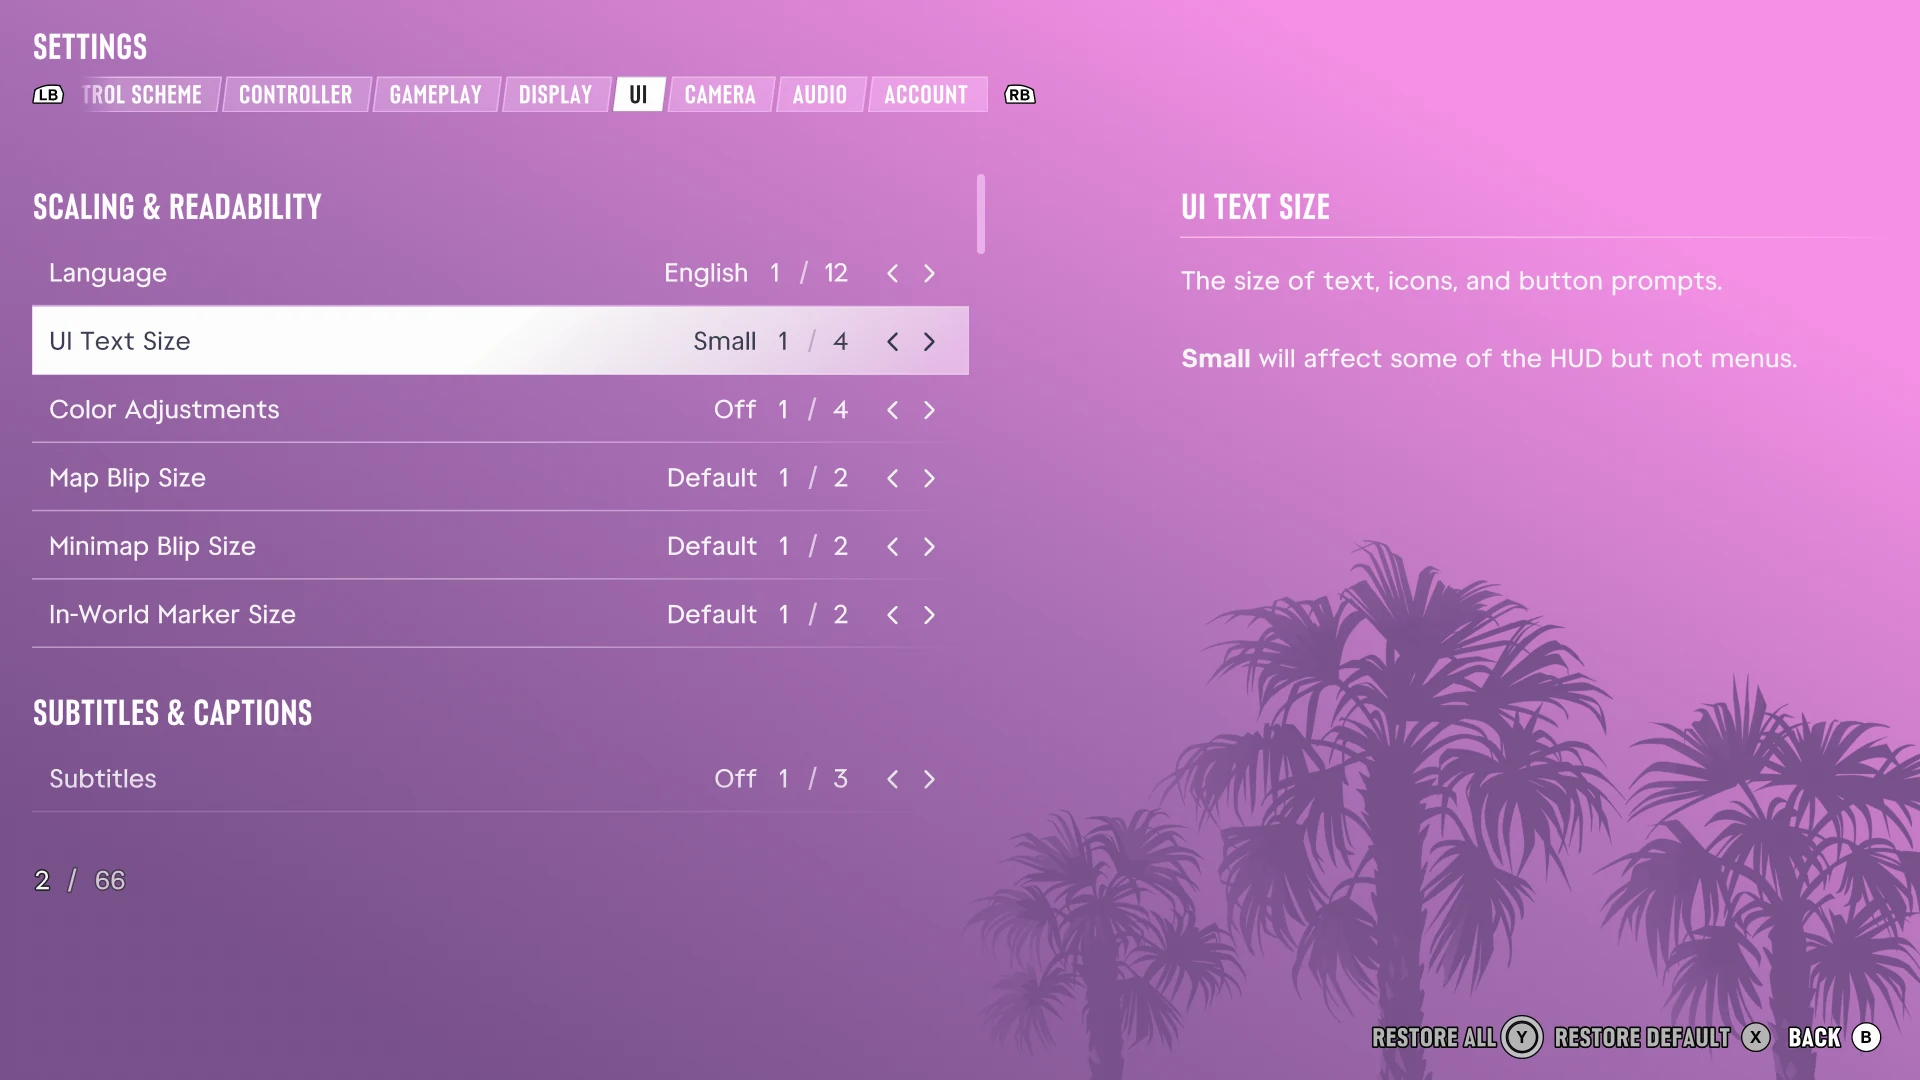
24. Language
Language selects the language used by the interface, including menus and the HUD. The screenshot shows English and twelve available choices. Reading instructions in the language you find easiest can reduce the effort of navigating menus. This setting does not, by itself, establish which languages are available for spoken audio or narration.
25. UI Text Size
UI Text Size changes text, icons, and button prompts. The four sizes are Small, Medium, Large, and Extra Large. The menu specifically says Small affects some HUD elements but not menus, so compare the larger settings in both places. If you play from a sofa, make the comparison from your usual seat. Text size options.
26. Color Adjustments
Color Adjustments changes interface and HUD colours, with Off, Protan, Deutan, and Tritan choices. These offer different colour treatments for players who find some colours difficult to distinguish. Compare important icons and markers using the mode that works best for your vision. The menu's four choices are separate from the Focus trail toggle. UI colour options.
27. Map Blip Size
A blip is an icon marking something on the map. Map Blip Size changes the size of those icons on the full map, so individual locations can be easier to spot. If the map itself is readable but its symbols are too small, this is the specific control to try. The screenshot shows two choices.
28. Minimap Blip Size
This changes the size of the icons inside the small map shown during play. It is useful when the map panel is big enough but the symbols within it are hard to pick out at a glance. It works separately from Minimap Size, which changes the whole panel. Two choices are shown.
29. In-World Marker Size
This resizes the markers that highlight things in the game world. A larger marker may be easier to locate against a busy scene, while a smaller one takes up less of the view. It changes how large the markers appear; In-World Markers, covered below, changes which markers are displayed.
30. Subtitles
Subtitles puts dialogue on screen as text. Off disables them, Mission Only limits them to moments the game considers important to the mission or story, and On provides broader dialogue coverage. This helps when speech is hard to hear or follow, or when you prefer to read along. Subtitle modes.
The screenshots only show the main Subtitles row. Other caption controls sit further down that menu. Our Minecraft accessibility guide explains why dialogue subtitles and captions for non-speech sounds address different needs.
Navigation settings
Where to find them: Settings → UI → Navigation. These controls let you choose which directions and markers stay visible while you move around the world.
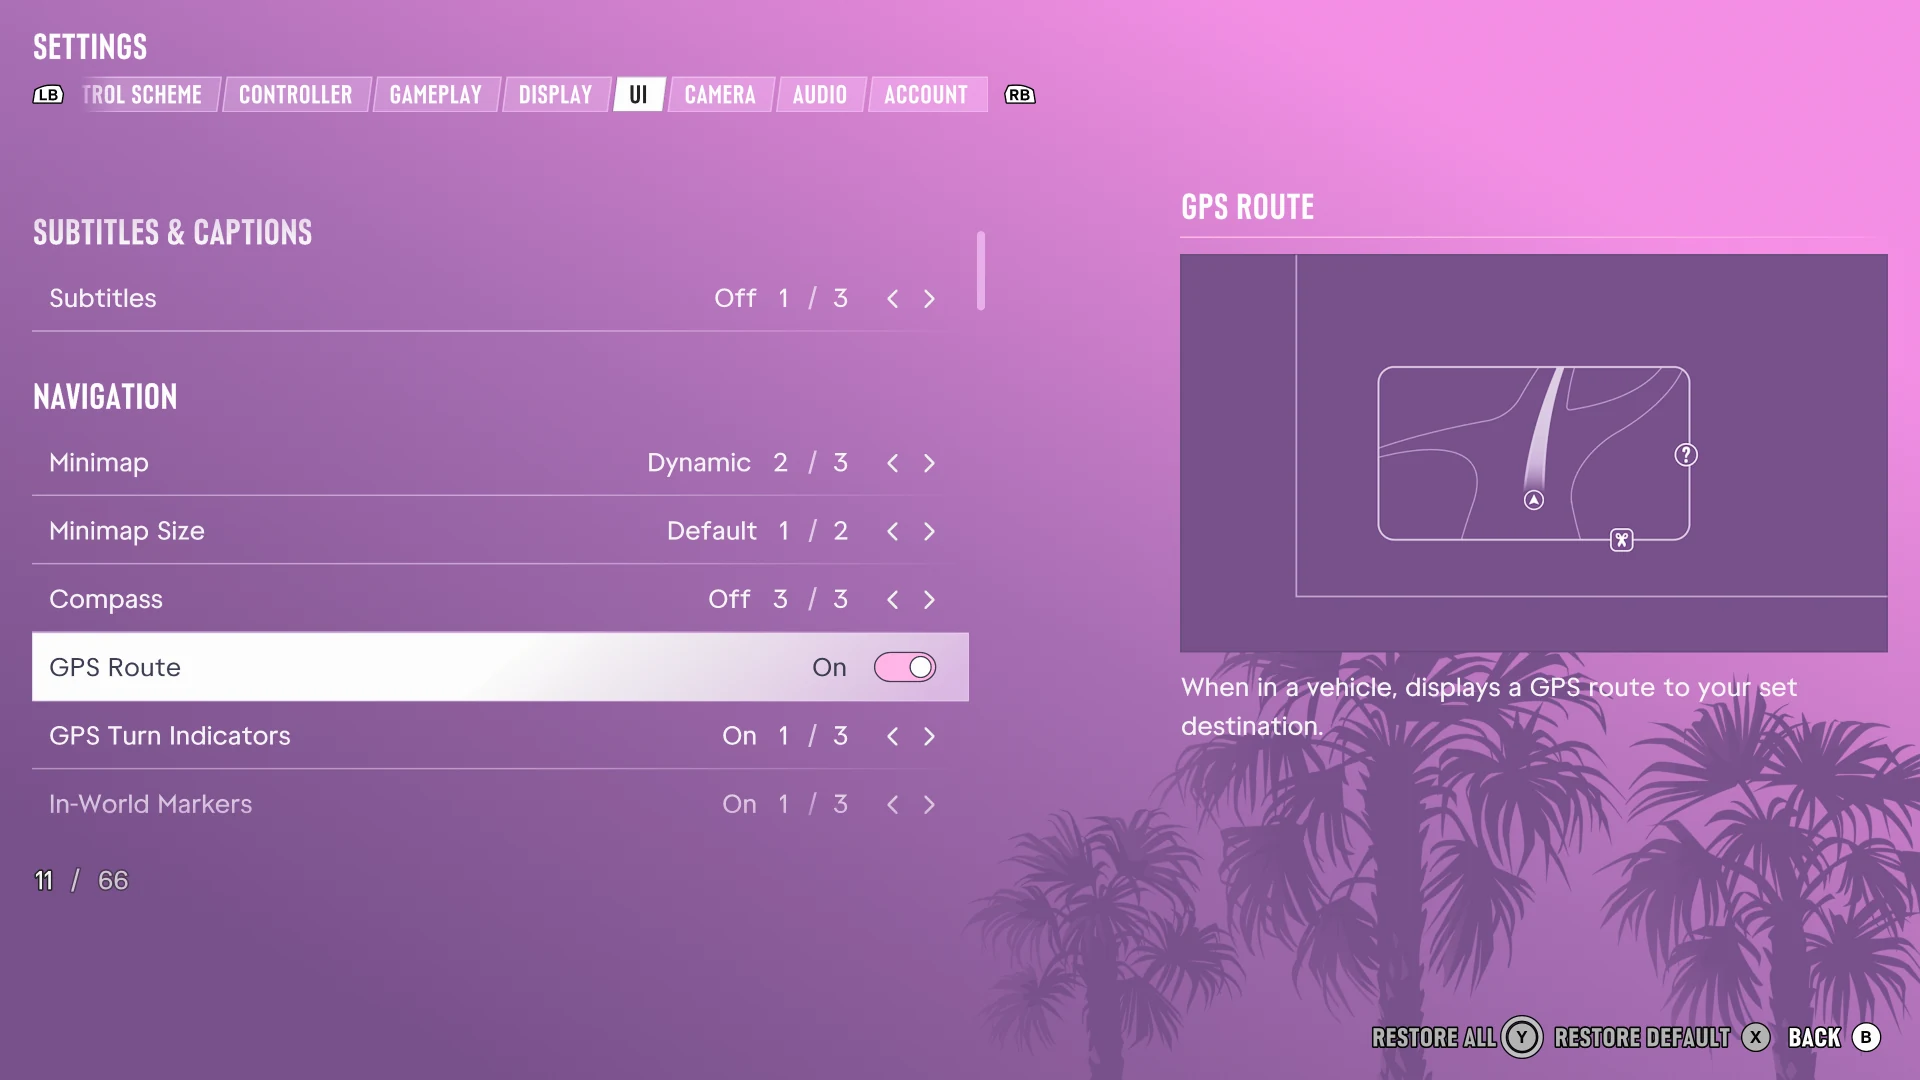
31. Minimap
Minimap chooses when the small navigation map appears. On keeps it available during ordinary play, Dynamic shows it in relevant situations, and Off hides it. A persistent map can reduce the need to call it up repeatedly; a dynamic map leaves more of the scene clear when you do not need it. Minimap modes.
32. Minimap Size
This changes the size of the minimap panel itself. Increasing it gives the map more screen space, which may make its roads and layout easier to read. If only its icons need enlarging, use Minimap Blip Size instead. The capture shows Default selected and two available choices.
33. Compass
The compass gives directional information on screen. Its On, Dynamic, and Off choices control how persistently it appears. It can provide an additional orientation cue alongside the minimap, particularly if you find a heading easier to follow than a small map. Choose the amount of information you want to keep visible. Compass modes.
34. GPS Route
GPS Route draws a route to your chosen destination when you are in a vehicle. That gives you a path to follow instead of having to work out each road from the map yourself. Turn it on when route planning competes with watching the road or managing the driving controls.
35. GPS Turn Indicators
These display upcoming turn directions on the HUD while driving. The choices are On, Highways, and Off, allowing turn guidance on all roads or just highways. They can make the next action easier to recognise without studying the entire route. Turn indicator options.
36. In-World Markers
These identify locations or points of interest within the scene itself. On shows the markers, Off hides them, and Objectives limits them to mission objectives and destinations you set. The Objectives option can help retain direction while reducing unrelated visual information. Marker size is controlled separately. Marker options.
37. Interaction Markers
Interaction Markers shows or hides markers beside things you can interact with. They can help distinguish a usable object from scenery and reduce the need to search for an interaction through trial and error. This toggle is visible at the top of the reticle screenshot below.
38. Altimeter
An altimeter is an altitude display. This toggle controls whether that information is visible when flying. Keeping it on gives you a direct way to monitor height, which can be easier than judging altitude from the landscape alone. It appears alongside Interaction Markers in the next screenshot.
Reticle settings
Where to find them: Settings → UI → Reticle. A reticle is the aiming mark on screen. These options change how easy it is to find and what information it conveys.
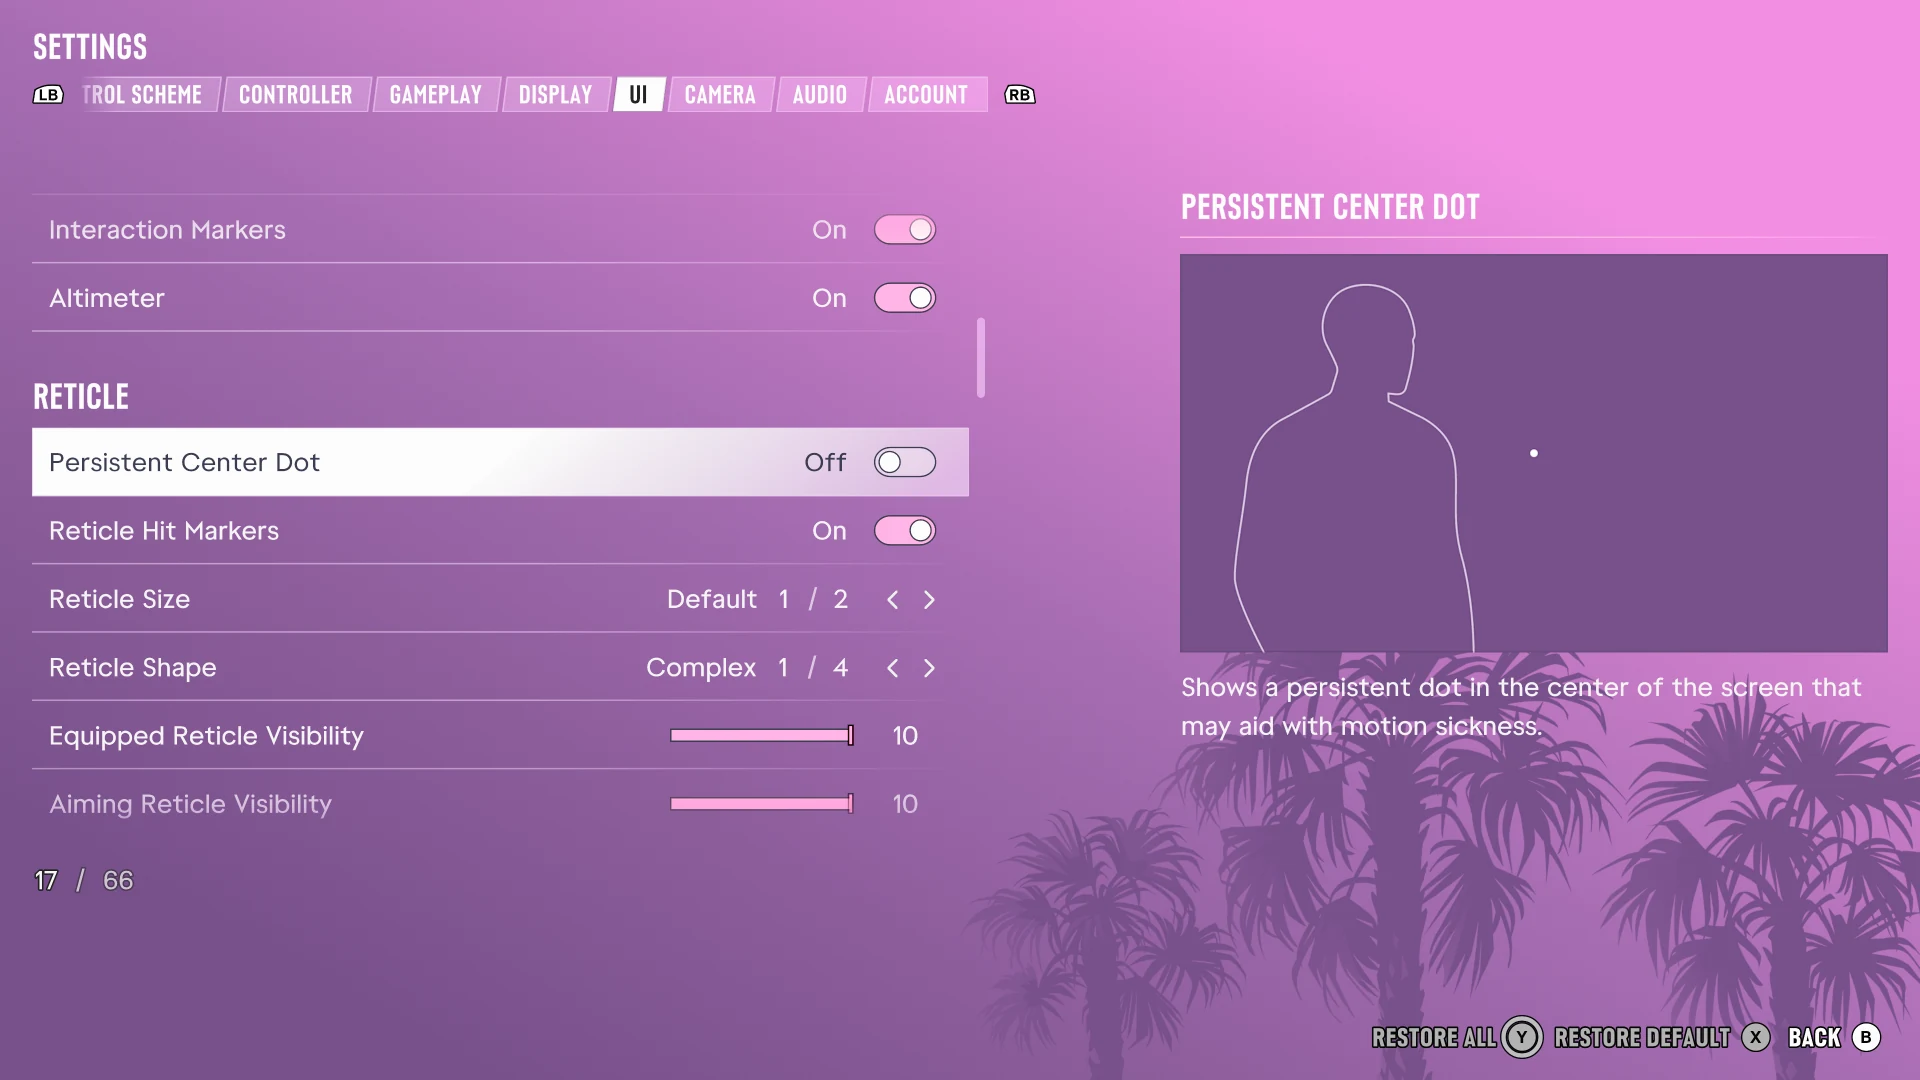
39. Persistent Center Dot
This keeps a dot at the centre of the screen, providing a steady visual reference as the scene moves. Rockstar's description says it may help with motion sickness. It is separate from the weapon reticle, so you can try it for visual comfort without treating it as an aiming adjustment.
40. Reticle Hit Markers
Hit markers provide visual feedback around the reticle when you damage a target. They can help confirm that a shot connected without relying entirely on sound or the target's animation. Turn them off if that extra feedback makes the aiming area feel too busy.
41. Reticle Size
Reticle Size changes how large the aiming mark appears. A larger mark can be easier to find quickly, especially against a detailed scene or when sitting further from the screen. Compare visibility and how much of the target it covers. The capture shows Default and two available choices.
42. Reticle Shape
The four choices are Complex, Simple, Dot, and None. Complex varies with the weapon; Simple uses a dot and a ring that reflects accuracy; Dot gives you just a point; None hides the reticle. Pick the amount of aiming information you can recognise most comfortably. Reticle shapes.
43. Equipped Reticle Visibility
This adjusts how visible the reticle is while your weapon is equipped but you are not actively aiming. A more visible mark can make it easier to locate the aiming area before raising the weapon. A lower value reduces its prominence while moving around. The screenshot shows 10.
44. Aiming Reticle Visibility
This controls reticle visibility specifically while aiming. You can keep the aiming mark prominent during a shot even if you prefer it less visible with a weapon merely equipped. Adjust it against different backgrounds, since a mark that is clear against a wall may be harder to find in a busy scene. The screenshot shows 10.
Audio and narration settings
Where to find them: Settings → Audio → Setup, Volume, and Narration. These controls change the sound mix, navigation audio, and spoken descriptions.
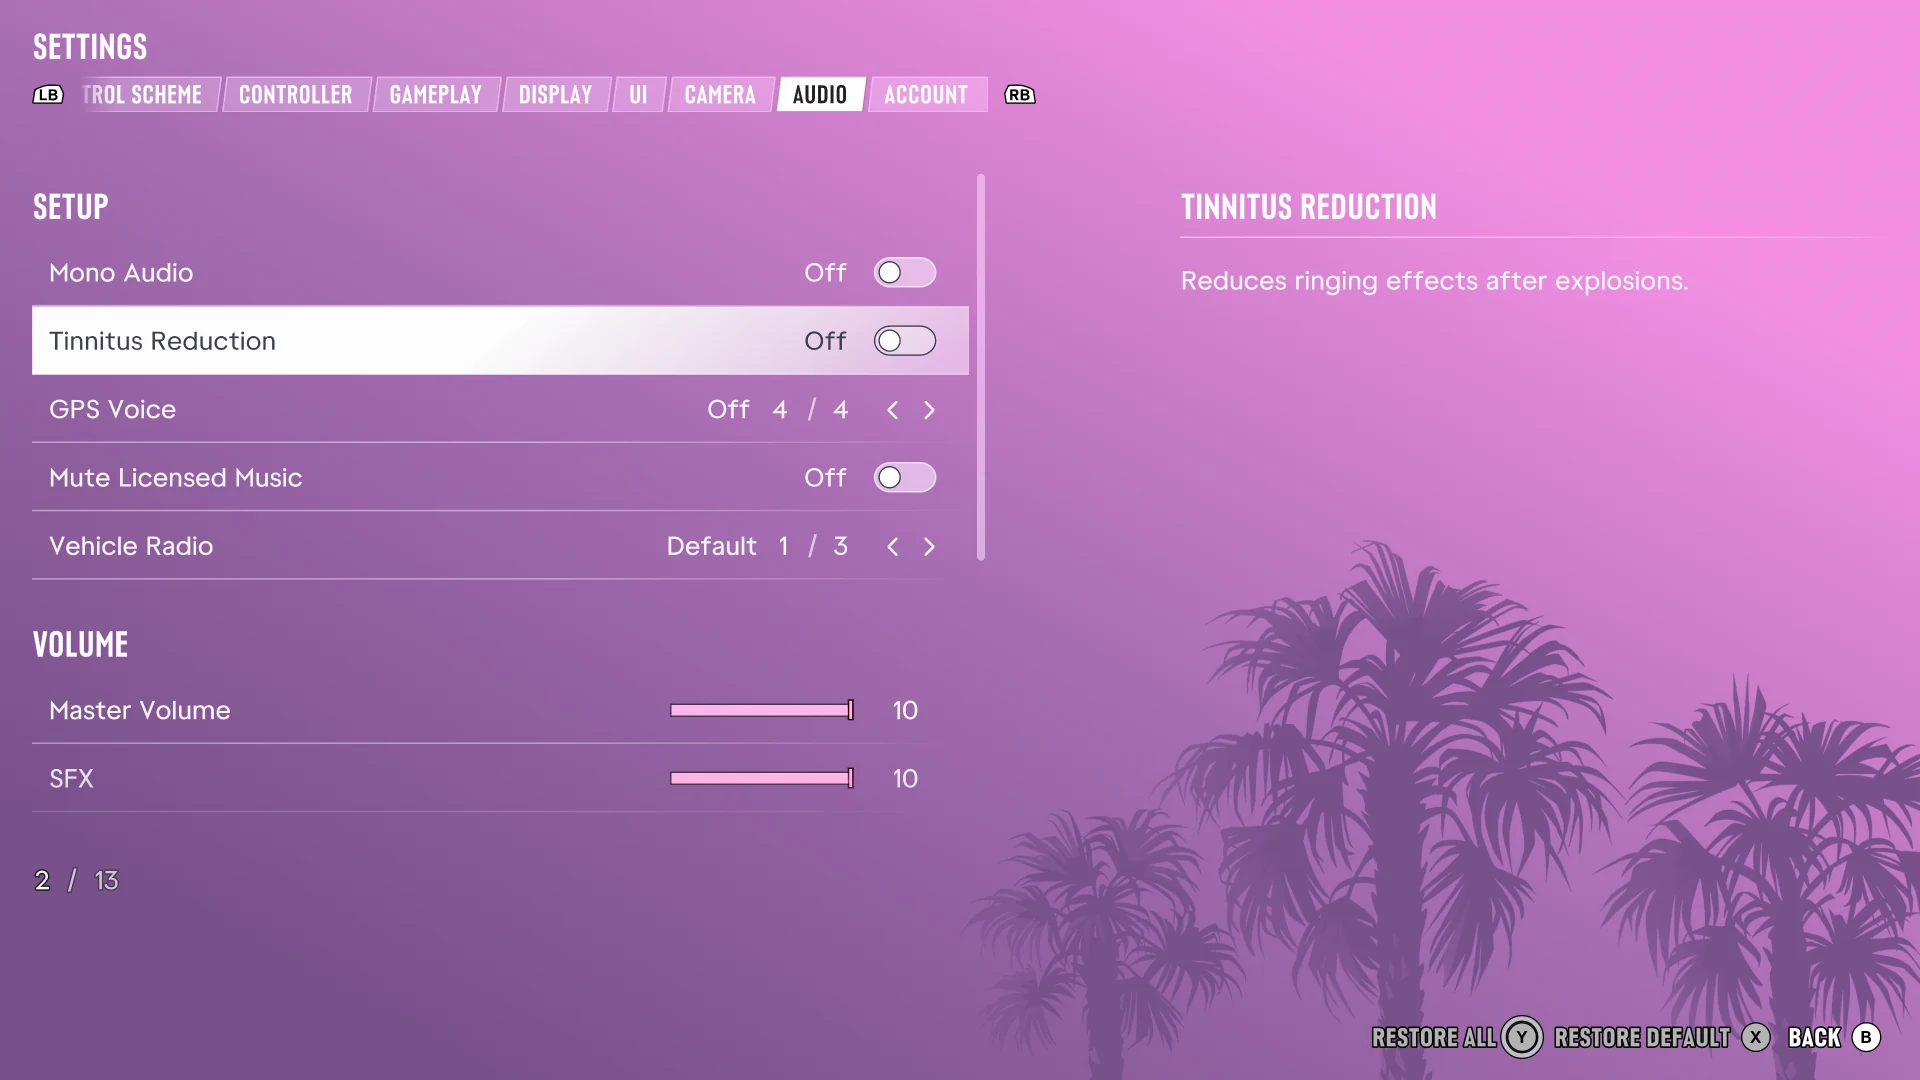
45. Mono Audio
Mono Audio combines the stereo information so the left and right outputs carry the same mix. It can help when listening through one side or when you do not hear both sides equally. You lose stereo separation, but sounds are no longer confined to one channel.
46. Tinnitus Reduction
This reduces the artificial ringing effect that follows explosions. If that effect is uncomfortable, you can reduce it without turning down the whole game. It targets a specific sound effect; dialogue, navigation, and the other volume channels have their own controls.
47. GPS Voice
GPS Voice chooses the audio used for driving directions. The options are On, Tones, Voice, and Off, providing combinations of spoken guidance and tones. It can complement the visible GPS route if you prefer hearing the next instruction while keeping your attention on the road. GPS audio options.
48. Mute Licensed Music
This silences licensed music tracks. It is useful when you want those songs removed from your play session or recordings while keeping other game sounds. It is separate from lowering the general Music channel, so use the control that matches what you want to quieten.
49. Vehicle Radio
Vehicle Radio controls what happens to the radio when you enter a vehicle. Default preserves the previous driver's radio state, On starts it, and Off switches it off. Choosing Off can help if music starting unexpectedly interrupts your attention or makes instructions harder to follow. Vehicle radio behaviour.
50. Master Volume
Master Volume changes the overall loudness of the game. Use it when the entire mix is too loud or quiet. If one type of sound is drowning out another, adjust the individual channels below instead: raising everything together does not change the balance between them.
51. SFX
SFX means sound effects. This slider changes their level, including the effects that make action scenes sound busy. Lower it if effects overpower speech or feel too intense. Keep useful sound cues in mind when comparing values, because effects can also tell you what is happening around your character.
52. UI
The UI volume slider controls interface sounds, such as menu and HUD feedback. Lower it if navigating menus is too noisy, or keep it audible if sound helps confirm your inputs. It changes the volume of interface effects rather than the size or appearance of the interface.
53. Dialogue
Dialogue changes the level of spoken conversations. It is useful when you want speech to stand out from music and effects. If it is already high, try lowering competing channels. You can also enable subtitles so you have a readable version of what is being said.
54. Music
Music changes the level of the game's music channel. Lowering it can leave more space for speech or reduce how much audio you have to process during play. It lets you keep the rest of the sound mix audible while choosing how prominent the music should be.
55. Media
Media controls audio from media within the game world, including television and radio. This is useful when those sources compete with a conversation or other information you want to hear. It gives you a way to reduce those sounds without lowering every effect in the scene. Media volume details.
All six volume sliders show 10 in the screenshot. Their complete ranges are not visible. Make a small adjustment, listen in an ordinary gameplay situation, and compare before changing another channel.
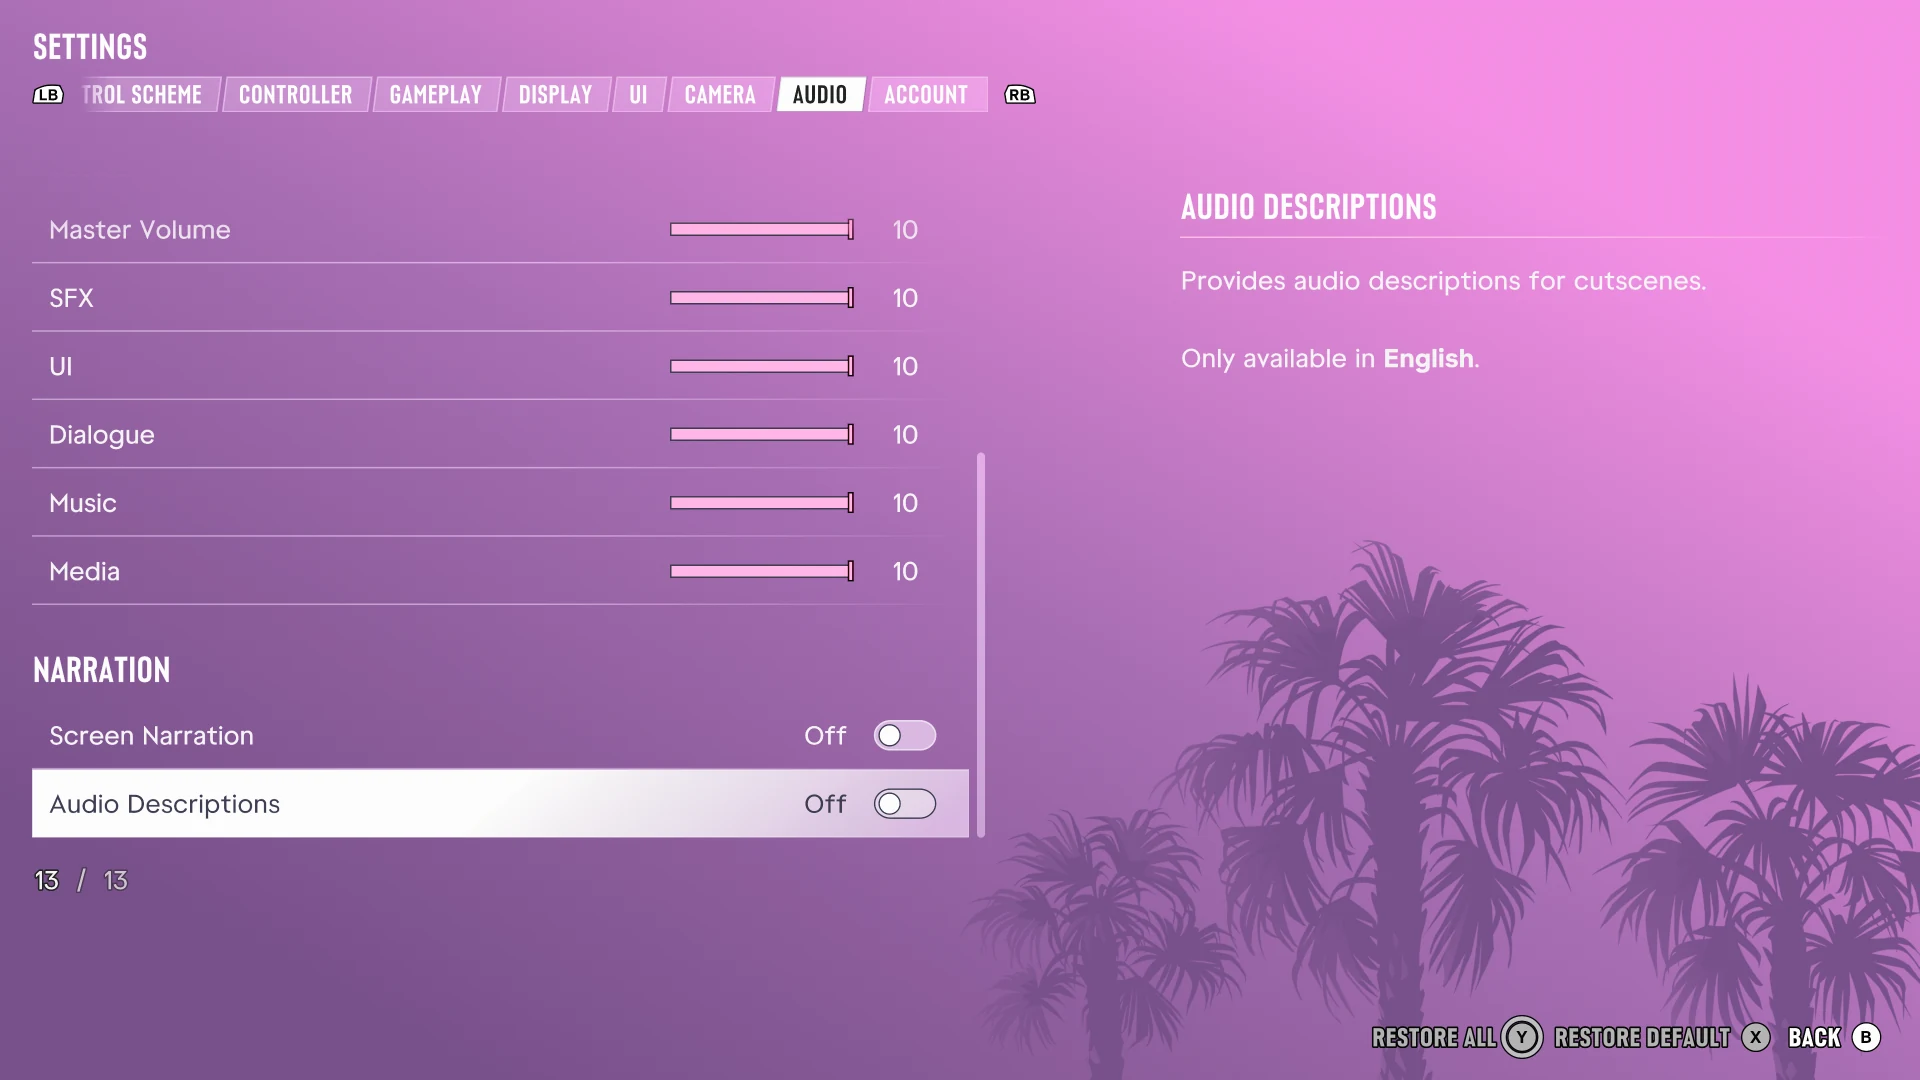
56. Screen Narration
Screen Narration reads interface information aloud. It can help with navigating menus or reading on-screen text when visual reading is difficult. Can I Play That's overview reports narration across much of the menus and UI; coverage of every screen is not established by these captures. It has its own toggle, separate from cutscene descriptions.
57. Audio Descriptions
Audio Descriptions adds spoken descriptions to cutscenes. Dialogue alone may not explain an expression, an action, or another visual story moment, so descriptions provide another way to follow what is happening. The menu explicitly states that this feature is only available in English. Enable it independently of Screen Narration according to what you need.
Menu narration and cutscene descriptions address different parts of the experience. They are encouraging additions, although their presence alone does not establish that every mission can be completed without sight.
Why this makes us more excited about GTA 6
There is a lot here to appreciate. A player can make the aiming point clearer, reduce an uncomfortable sound, change a tiring input, or get more help following the story. Those are different problems, with different controls to address them.
That flexibility gives more people a chance to find a setup that lets them enjoy the game. It also gives the same person room to adjust from one day to the next. Hands get tired. Reading needs change with the screen and the room. Sometimes you want a demanding fight; sometimes you want to keep the story moving.
This is a familiar idea to us. Our browser extension, Helperbird, gives people ways to adapt their reading experience on the web. Its reading tools include text to speech, a distraction-reducing reading mode, and a focus ruler. They can help with reading articles and game guides like this one. The shared principle is simple: let the person using something choose how it works for them.
We talk about the same principle in how we assess game accessibility. A useful setting addresses an actual barrier, and its value comes from what it lets someone do.
So yes, we're excited to spend time in Rockstar's Leonida. We're also pleased to see this much attention given to the ways people read, listen, navigate, and use a controller. Credit to Rockstar for putting these choices in players' hands.
Open Settings. Make yourself comfortable. Then get back to that one mission you definitely intended to do.
Menu screenshots show GTA VI with Xbox button prompts. Game imagery and the GTA VI mark belong to Rockstar Games. This is an independent Coffee & Fun guide.